Pre-delivery photo prep: the local batch pipeline cloud uploaders skip
Wedding and event photographers move 1,000+ files per delivery. The cloud route burns 90+ minutes and leaks GPS. A local batch pipeline does it in 8 minutes and never touches a server.
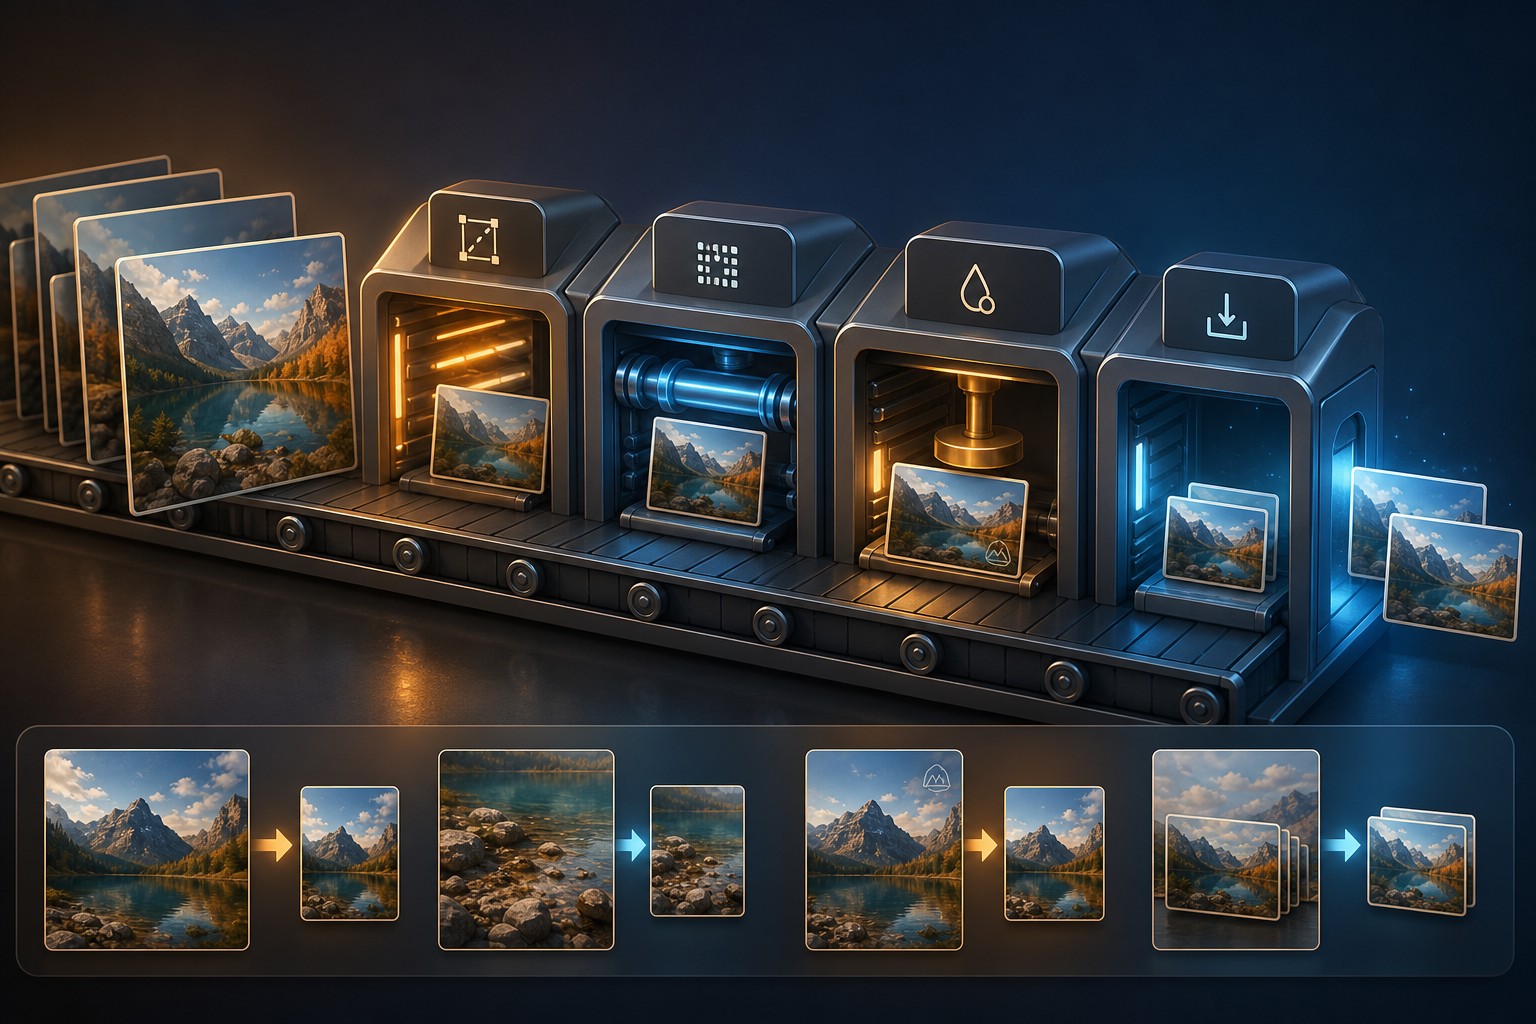
A wedding photographer wraps a Friday-morning shoot, sits down at 4 PM, and has to hand 1,180 high-res JPEGs to the bride by midnight. The first hour goes to culling. The second hour goes to color and crop. Then comes the part nobody warns you about: the four boring transformations that stand between a folder of finished edits and a delivery the client can actually use. Resize to a sane long edge. Strip metadata so the GPS trail of the venue doesn't leak. Watermark the previews. Rename and folder by gallery slug.
The popular answer is a cloud uploader. Drag the folder in, wait, watch the meter, drink coffee. Forty minutes later the upload finishes, and the tool spends another forty minutes resizing on someone else's CPU before serving back a zip. By the time the photographer is downloading the result, an hour and twenty minutes have evaporated, the laptop fan is at 9 PM volume, and a gigabyte of unedited client material sits on a server they have not vetted. None of that is the photographer's job. Their job is the photo.
The local-batch alternative is rarely written up because it sounds boring. It is also five to ten times faster, leaks nothing, and survives a flaky hotel Wi-Fi connection. The cost is a one-time hour spent building the pipeline. After that it runs in the background while the photographer goes back to color grading.
This piece walks the four stages of that pipeline, what each one is actually doing under the hood, and where the desktop tools earn their keep over the cloud equivalents.
The four stages of every delivery prep
Almost every photo delivery, regardless of genre, runs the same shape. Lay it out so the rest of the pipeline has names to attach to:
- Standardize. Convert to a single color profile (almost always sRGB), resample to a target long edge, apply mild output sharpening calibrated to the new size.
- Strip metadata. Remove EXIF GPS, camera serial, and any IPTC fields the client does not need. Keep copyright and contact.
- Watermark. Apply a non-destructive watermark to preview-tier outputs only — never to the master deliverables.
- Rename and folder. Slug the filenames so they sort, group them into the right gallery folder, and assemble a manifest the client can read.
Cloud tools collapse these stages into one wizard with a few toggles. That is the source of every workflow complaint photographers have. The toggles are not granular enough, the order is fixed, and the privacy boundary is wrong by default. A local pipeline keeps the stages separate and lets you re-run any one of them without re-doing the others.
Why cloud uploaders fail this specific workflow
Three structural reasons, all of which compound on a Friday at 7 PM.
Throughput is bound by upload, not compute. A modern CPU resizes a 24-megapixel JPEG in roughly 50 ms. A typical residential upstream is 20 Mbps, and a 6 MB JPEG takes 2.4 seconds to push, plus protocol overhead. The bottleneck of the cloud route is your ISP, not anyone's GPU. For 1,000 images the cloud route is 40+ minutes of upload before any work begins. The local route starts working immediately.
Privacy boundary is wrong by default. Wedding venues, family homes, school campuses, hospital lobbies — the EXIF GPS on the original tells you, to within ten meters, where the shoot was. Most cloud tools strip this on export, but only after they've written it to their own storage layer for the duration of the job. A local pipeline never lets the GPS leave the laptop.
Reliability budget is too tight. Hotel Wi-Fi drops. The conference center's "guest" SSID throttles to 1 Mbps after the first gigabyte. The job-completion email gets caught by Gmail's promotions tab and you don't see it until 11 PM. Each of these is a 1-in-30 event, but you are running 30+ deliveries a year, so they compound to one missed deadline per year. Local pipelines have no equivalent failure mode.
Stage 1 — standardize
Pick three numbers in advance and never change them mid-project:
- Long edge in pixels. 2048 px for client web previews. 3000 px for "print up to A4." Original size for masters.
- Color profile. sRGB for anything web-bound. AdobeRGB only on master TIFFs going to a print lab that explicitly wants it.
- Sharpening amount. A small, conservative unsharp mask calibrated to the output size. Strong sharpening at master size becomes crunchy at 2048 px; weak sharpening at master size becomes mush.
A desktop tool with a saveable preset for each output tier — "previews-2048-srgb-mild," "client-3000-srgb-medium," "masters-passthrough" — turns this stage into one click per delivery instead of one decision per delivery. Decisions made in advance scale linearly with batches; decisions made per-image do not scale at all.
Stage 2 — strip metadata (the part nobody mentions)
Open any JPEG straight from a modern camera in exiftool and the output runs to 200+ fields. The ones that matter for this conversation:
GPS Latitude / GPS Longitude         — venue coordinates
Camera Serial Number                 — links any image back to the camera body
Owner Name / Copyright Notice        — usually fine to keep
Lens Serial Number                   — can identify a specific kit
IPTC Caption / Keywords              — your internal tags, not for the client
Software                             — your edit history, by version
The instinct is to nuke everything and ship a clean file. That over-corrects. Some metadata helps the client: the copyright notice is actively useful, especially if a delivery later gets reposted. What you want is a per-field policy, applied as a batch.
A working policy:
KEEP    Copyright, Artist, ImageDescription, IPTC:By-line
REMOVE  GPS*, *SerialNumber, IPTC:Keywords, IPTC:Caption, Software
NORMALIZE  Orientation (apply rotation, then drop the field)
The normalize line is non-obvious. Some viewers respect the EXIF orientation flag, some don't. If you keep the flag, half your client's tools will display rotated images, half won't. Apply the rotation physically and drop the flag — your client never sees a sideways photo. Cloud tools rarely do this; they preserve the flag because it is one fewer line in their reseller pipeline.
Stage 3 — watermark, but only for previews
Watermarking is binary in most photographers' minds: you do it or you don't. The right unit is the output tier.
- Masters. No watermark. Ever. The client paid for clean files.
- Client-side previews. A subtle right-edge gradient with the studio mark. Visible but not destructive.
- Public-web previews and proofs. A larger, opaque mark across the lower third. The mark is the point.
The "right-edge gradient" trick is worth knowing. Instead of a centered logo (cropped out) or a corner mark (clone-stamped out in 30 seconds), composite the studio name into a soft horizontal gradient from the right edge inward. It survives screenshot-and-crop because removing it requires reconstructing real image content under the gradient. Build it once as a PNG with a transparent left-fade, save it as a watermark preset, and apply it across the preview tier in batch.
A common mistake: applying the watermark before metadata stripping. Some metadata-stripper tools rewrite the JPEG container in a way that loses overlay quality if you re-encode twice. Strip first, watermark second, never the other way around.
Stage 4 — rename and folder
The final stage is the boring one and the one that wins repeat clients. Two outputs:
- A consistent file naming convention.
{gallery-slug}-{4-digit-sequence}.jpg. Never the camera'sIMG_*original. Sequence numbers come from the cull order, not the EXIF capture order — clients want the gallery to read like a story, not a clock. - A folder layout the client can navigate.
{deliverable-tier}/{gallery-slug}/. Tiers gomasters/,previews/,proofs/. Each tier matches one preset bundle from stages 1–3.
Optional but worth doing: drop a one-line manifest.txt into each folder with the sequence count and the preset names used. When the client emails three months later asking "is the version I downloaded the watermarked one?" you have an instant audit trail.
Gluing it together: the folder-monitor preset
The point of doing this on the desktop is that the four stages become a single drop event. Build the pipeline once, then the daily workflow looks like this:
- Drop the finished-edit folder into
~/Deliveries/_inbox/{gallery-slug}/. - The folder monitor sees the new directory, identifies which preset bundle matches the gallery slug pattern, and runs all four stages in sequence.
- The output appears under
~/Deliveries/_outbound/{gallery-slug}/{tier}/. - A toast notification fires when the run finishes.
This is what the cloud tools cannot offer, regardless of how good their batch UI is: a pipeline that begins the moment the file is on disk and ends without your active attention. For a photographer running a delivery a week, the difference between a workflow that needs babysitting and one that does not is the difference between Friday-night and Saturday-morning delivery.
The numbers, end to end
A representative delivery: 1,200 finished JPEG edits, average 7 MB each, three output tiers required.
- Cloud route. ~70 minutes upload at 20 Mbps, ~25 minutes server-side processing, ~15 minutes download of the result. Total 110 minutes, plus the period during which client-identifiable material sits on someone else's storage.
- Local route, modern laptop. ~6 minutes for stage 1 (resize + sharpen), ~30 seconds for stage 2 (strip), ~90 seconds for stage 3 (watermark, previews tier only), ~10 seconds for stage 4 (rename + manifest). Total 8 minutes, every byte stays on the laptop.
The 100-minute gap is not a one-off. Multiplied across a season, it is the difference between same-night delivery and "by tomorrow afternoon." The gap is also the difference between a workflow that survives a 3-Mbps hotel connection and one that doesn't.
What you give up
Honest tradeoffs, because the local route is not free.
- A one-time setup cost. An hour to wire up the four presets and the folder monitor. After that it runs unattended.
- Less collaboration friction-relief. Cloud tools shine when an assistant in another city handles the prep stage. A local pipeline assumes the prep happens on one machine.
- Per-machine state. The presets live on a specific laptop. Photographers running two machines should keep the preset bundle in a synced folder so the secondary machine inherits the same configuration.
None of these are dealbreakers. All three are worth the time savings on every delivery for the rest of the year.
The harder lesson behind all of this: a delivery pipeline is infrastructure, not a tool choice. The cloud route treats it as a tool choice and pays the tax every Friday night. The local route treats it as infrastructure, builds it once, and stops thinking about it.
Related in the StoicSoft network
If you regularly stitch together PDF, image, video, or batch-file workflows like the ones above, 1FileTool is the StoicSoft network's purpose-built desktop app — 245+ local-first tools, pay-once, files never leave the device.